
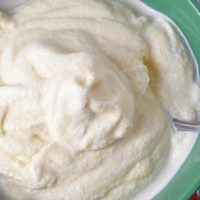
Make the best old fashioned homemade ice cream recipe with raw eggs, using an old-fashioned ice cream maker. My family’s old school vanilla ice cream recipe has the most amazing flavor! It’s perfect for backyard bbq’s, church potlucks, and family gatherings.
Much like my dad’s homemade banana ice cream, my family’s homemade vanilla ice cream recipe has been a part of every summer for as far back as I can remember. While it’s morphed from person to person, it’s pretty much the same old fashioned ice cream I remember enjoying with family on special summer occasions gone by.
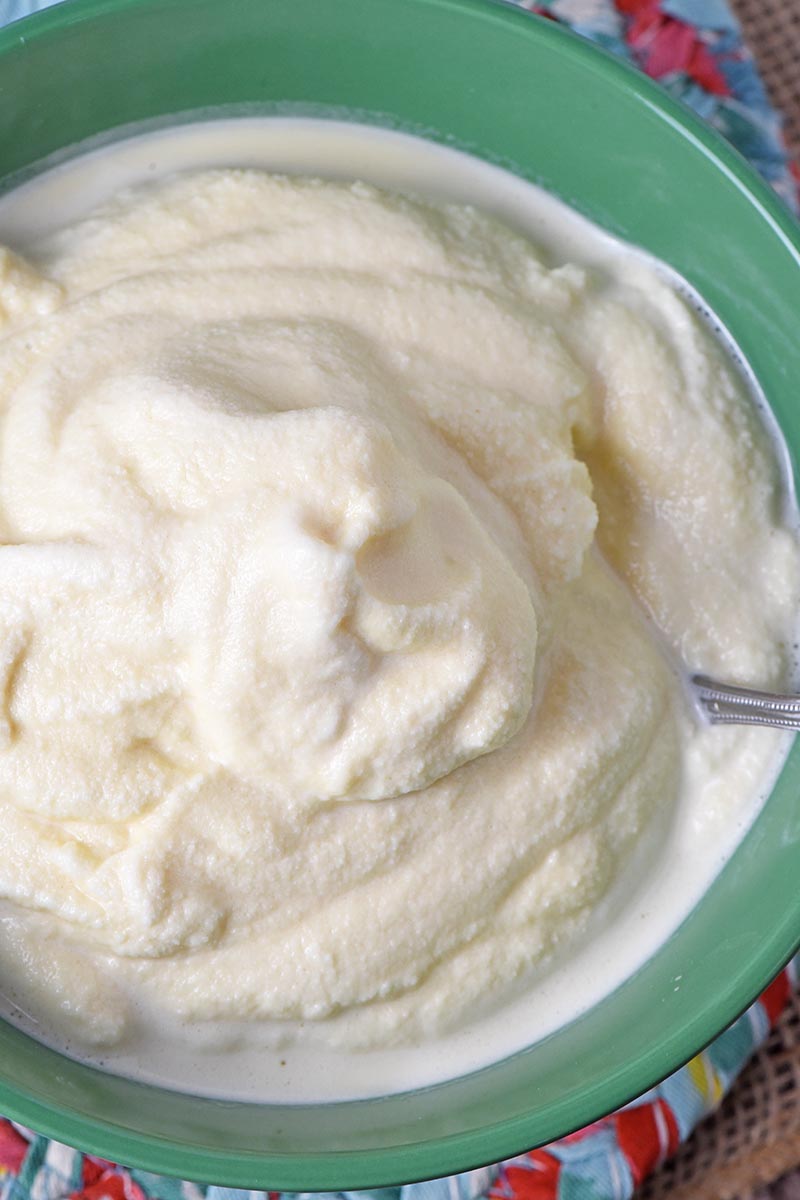
I love using homemade vanilla ice cream with condensed milk to sandwich together chocolate chip cookies, and we love using it to make a delicious homemade vanilla milkshake, strawberry milkshake, or sometimes this pineapple milkshake. It has amazing flavor and makes the best vanilla ice cream ever.
TIPS FOR HOW TO MAKE VANILLA ICE CREAM
First of all, make sure your ice cream freezer, especially the canister, is washed out good. We store ours in the garage, so we always have to wash it before we use it.
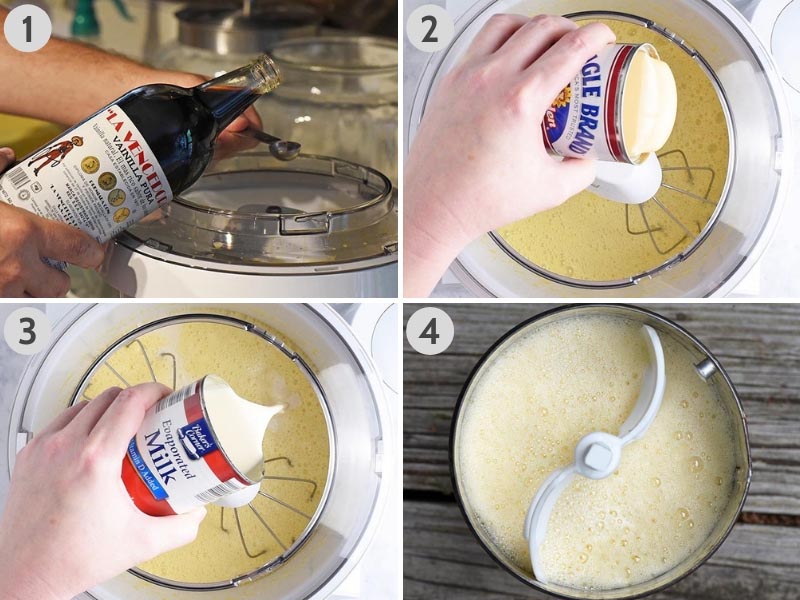
I recommend using a mixer to mix up homemade vanilla ice cream with eggs; this will ensure that the ingredients are mixed really well, especially the eggs*.
- Start by creaming (or mixing) the eggs* and the sugar together. Then add in the vanilla extract. Did you know you can even make your own vanilla?
- Next, mix in the sweetened condensed milk, scraping all the ooey gooey liquid out of the can with a spatula.
- Then add both cans of evaporated milk, and add in a good-sized dash of salt, which equals out to about a teaspoon. Mix everything together well.
- Pour the mixture into the metal canister of your ice cream maker. Then finish topping off the canister with whole milk, making sure to fill it about 3/4 of the way full, leaving room for expansion as it freezes. Your metal canister should have a fill line.
HOW TO FREEZE HOMEMADE ICE CREAM WITH AN OLD FASHIONED ICE CREAM MAKER
Freezing the mixture to make homemade vanilla ice cream is fairly easy, especially once you get it going. You will need to stay with it so you can monitor if it needs more ice, rock salt, or needs unplugged when done.
While I always advise you to follow manufacturer instructions for your specific ice cream maker, here are a few tips. You can also read our complete guide to the old-fashioned ice cream maker for more tips and suggestions.
- Put the lid on, and place the metal canister down into the bucket of your ice cream maker.
- Crush a big bag of ice, gradually pouring ice around the canister. Tip: You can add up to a gallon of water if needed, as well. We sometimes do this because our motor will seize up. Adding a bit of water will help it keep turning.
- Add 2-3 cups of rock salt as you add the ice, making sure to top it off with rock salt.
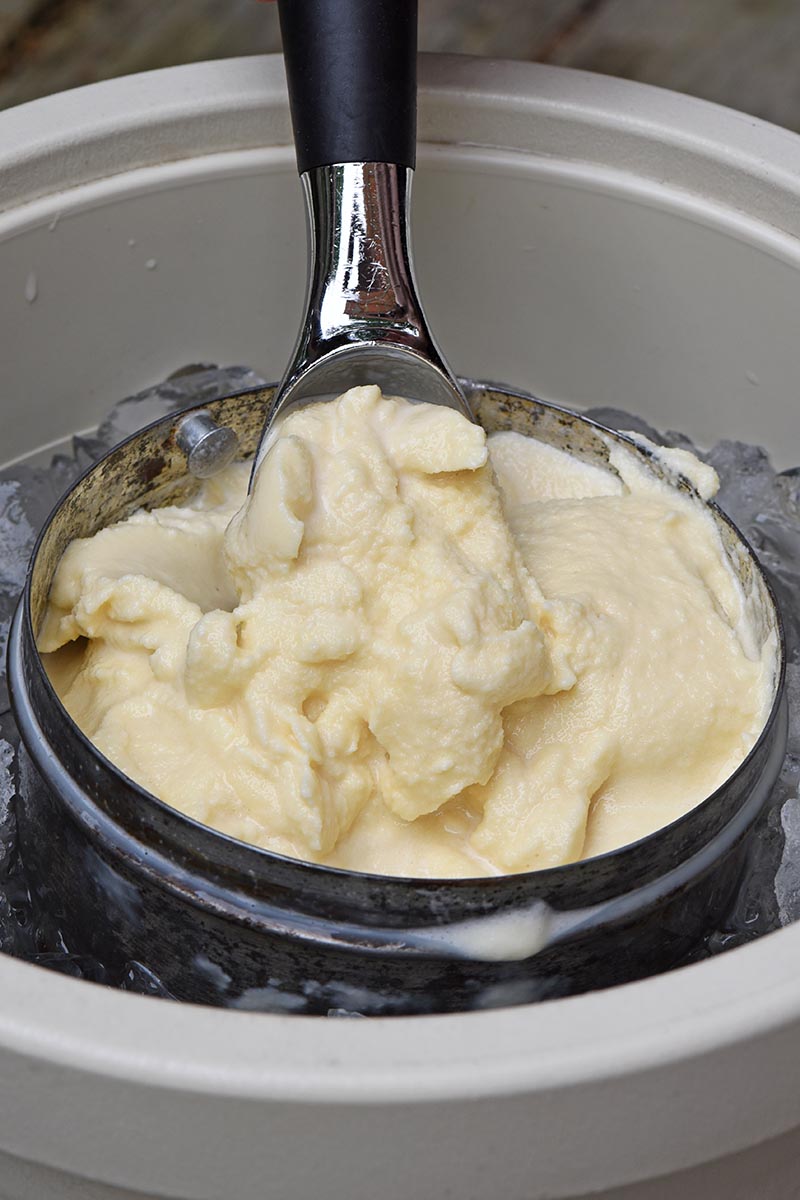
- Let the motor run until it stops. Once the ice cream is frozen, the motor on your ice cream maker will stop churning. Unplug it immediately. This should signal that the ice cream is completely frozen.

Wipe any excess ice or rock salt off the lid and out from around the top of the canister. Then remove the lid.
Carefully remove the churning paddle, and serve the ice cream immediately.

If you’re not ready to serve it up just yet, you can always leave the lid on, remove the motor, top the canister off with ice, and place a towel or two over it to insulate it and keep it cold.
WHERE TO FIND ROCK SALT
While you can find smaller bags or boxes of rock salt online and at the grocery store, sometimes you can get a bigger and less expensive bag at a hardware store or feed store.
WHAT TO PAIR WITH VANILLA ICE CREAM
Homemade vanilla ice cream pairs really well with desserts like gluten-free apple crisp, fresh strawberry pie, peach cobbler, gluten-free peach crisp, peach cobbler made with Bisquick, blueberry cobbler, cherry pineapple dump cake, peach cobbler dump cake, sliced baked apples, and apple crumb pie.
FAVORITE MIX-INS FOR HOMEMADE VANILLA ICE CREAM
There are so many things you can mix into or serve with your ice cream to make it even more fun, especially with kids.
- Fruit or Fruit Jam or Berry Fruit Salad – We especially love mixing blueberry sauce, strawberry jam, peach freezer jam, or blackberry jam into our ice cream.
- Chocolate Syrup, Butterscotch Topping, Caramel Topping, etc. – With whipped cream and a cherry on top.
- Oreo Cookies – I especially love crushing up Oreo Minis.
- Chocolate candies – Like M&M’s, Snickers, Reese’s Peanut Butter Cups, and more.
- Brownies or Cookies
- Vanilla ice cream is delicious served over a bowl of warm microwave apples.
- There’s nothing more refreshing than a slice of my favorite lemon Jello poke cake with a scoop of vanilla ice cream on a hot summer day!

MORE HOMEMADE ICE CREAM RECIPES:
SHOP KITCHEN TOOLS FOR THIS RECIPE:
Mixer – A mixer will ensure you mix everything together really well.
Ice Cream Freezer – This is an ice cream maker recipe, so you’ll need a maker/freezer.
Food Storage Containers – We use dishes similar to these to store our ice cream in the freezer, especially when we have a big batch.
Ice Cream Scoop – Can’t have ice cream without a scooper.
GET THE PRINTABLE RECIPE
If you love this old fashioned ice cream recipe as much as I do, please write a 5 star review, and help me share the recipe on Facebook and Pinterest!
Find my original recipe for vanilla ice cream over on Adventures of Mel!
If you try this recipe, why not leave a star rating in the recipe card right below and/or a review in the comment section further down the page? I always appreciate your feedback. You can also follow me on Pinterest, Facebook, YouTube, and Instagram. And subscribe to my email list too!
Old Fashioned Homemade Ice Cream Recipe with Raw Eggs
Ingredients
Ice Cream:
- 6 large eggs*
- 1 1/4 cups pure cane sugar
- 4 teaspoons vanilla extract
- 14 ounces sweetened condensed milk
- 24 ounces evaporated milk
- 1 teaspoon salt
- 6 cups whole milk**
Freezing Ingredients:
- 16 pounds ice
- 3 cups rock salt
Instructions
- Start by creaming (or mixing) the eggs and the sugar together using a mixer.
- Then add in the vanilla extract.
- Next, mix in the sweetened condensed milk, scraping all the ooey gooey liquid out of the can with a spatula.
- Add both cans of evaporated milk.
- Add in a good-sized dash of salt, which equals out to about a teaspoon.
- Mix everything together well.
- Make sure your ice cream freezer, especially the canister, is washed out and ready.
- Pour the mixture into the metal canister of your ice cream maker.
- Finish topping off the canister with whole milk, making sure to fill it about 3/4 of the way full, leaving room for expansion as it freezes. Your metal canister should have a fill line.
- Put the lid on, and place the metal canister down into the bucket of your ice cream maker.
- Crush a big bag of ice, gradually pouring ice around the canister. Tip: You can add up to a gallon of water if needed, as well. We sometimes do this because our motor will seize up. Adding a bit of water will help it keep turning.
- Add 2-3 cups of rock salt as you add the ice, making sure to top it off with rock salt.
- Let the motor run until it stops. Once the ice cream is frozen, the motor on your ice cream maker will stop churning. This should signal that the ice cream is completely frozen.
- Unplug it immediately.
- Wipe any excess ice or rock salt off the lid and out from around the top of the canister. Then remove the lid.
- Carefully remove the churning paddle.
- Serve the ice cream immediately. If you’re not ready to serve it up just yet, you can always leave the lid on, remove the motor, top the canister off with ice, and place a towel or two over it to insulate it and keep it cold.
This is the only ice cream recipe that I have had set up in my ice cream maker. It’s very yummy and my entire family loves it!! Do you have a chocolate ice cream recipe? Do I just add cocoa powder to the vanilla base? I’m really hesitant to try another recipe and not have it set up.
I’m so glad it turned out well for you! Unfortunately, I don’t currently have a chocolate ice cream recipe, but it is one that I am thinking of trying! Thanks again.
I have a 2 qt ice cream maker how can I use this recipe for my ice cream maker what’s the ratio?
Cindy, this recipe is for a 4 quart ice cream maker. For a 2 quart, you will simply cut everything in half.
My eggs curdled. Any fixes for before I put in the mixer
Lisa, why did they curdle? I’m not sure that they would be usable after this. Did you try to pre-cook them?
I was so glad to find your recipe as it was similar to my Mother’s however yours gave instructions which I appreciated. Made it last night to rave reviews by all!! Thank you!💞
Thank You so much for the kind review, Teri!
Can’t wait to make it ❤️ 🍦 🍦🍦
It’s so good!
Following the recipe exactly. Been churning for over a hour and is barely getting thick, how long does it usually take?
It should be thickened by now. Have you added more ice and rock salt as needed? How much did you add? Keeping it cold is essential.
I followed the recipe exactly as written. My ice cream maker ran for four hours and never thickened. Ending up using two bags of ice and two cups of rock salt. Help??
Karen, I’m so sorry it didn’t turn out for you! I don’t know why it would do that. Is it possible that more rock salt was needed? Did you add more ice and rock salt as it melted? It is essential that it is kept very cold.
This is exactly the way our family made it as well. I will always remember taking turns cranking the churn on the old style ice cream freezers. I was thankful when we finally purchased the electric churns but sometimes miss the hand churn. I think it was even better when we had to work a little harder to get it. Thank you for sharing.
Jerri, I think you’re right. The hard work definitely made it taste better. Thanks for the kind review!
Delicious but extra did not taste well after being placed in the freezer. Was wonderful when it was freshly churned.
Linda, I wonder why it didn’t taste good after being placed in the freezer….Sometimes ours hardens up a bit, but it never tastes any different. Thank You for the feedback.
This is the way we all made it. Never cooked the eggs and never got sick. We had it all the time in the winter and summer. Well anytime we could get mom and dad to get the ingredients to make it. Lol.
Tracie, I don’t ever remember making homemade ice cream any different either. We’ve yet to get sick from the raw eggs!