

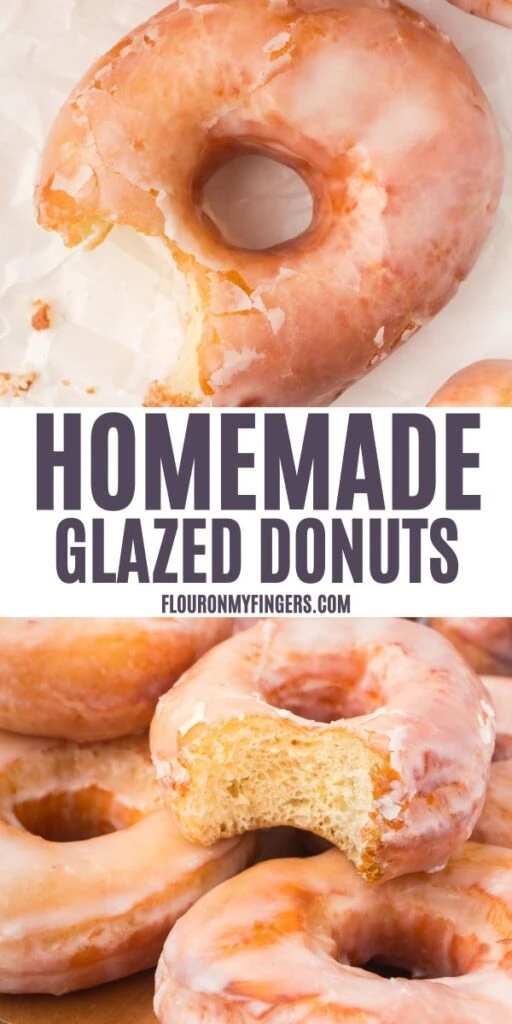
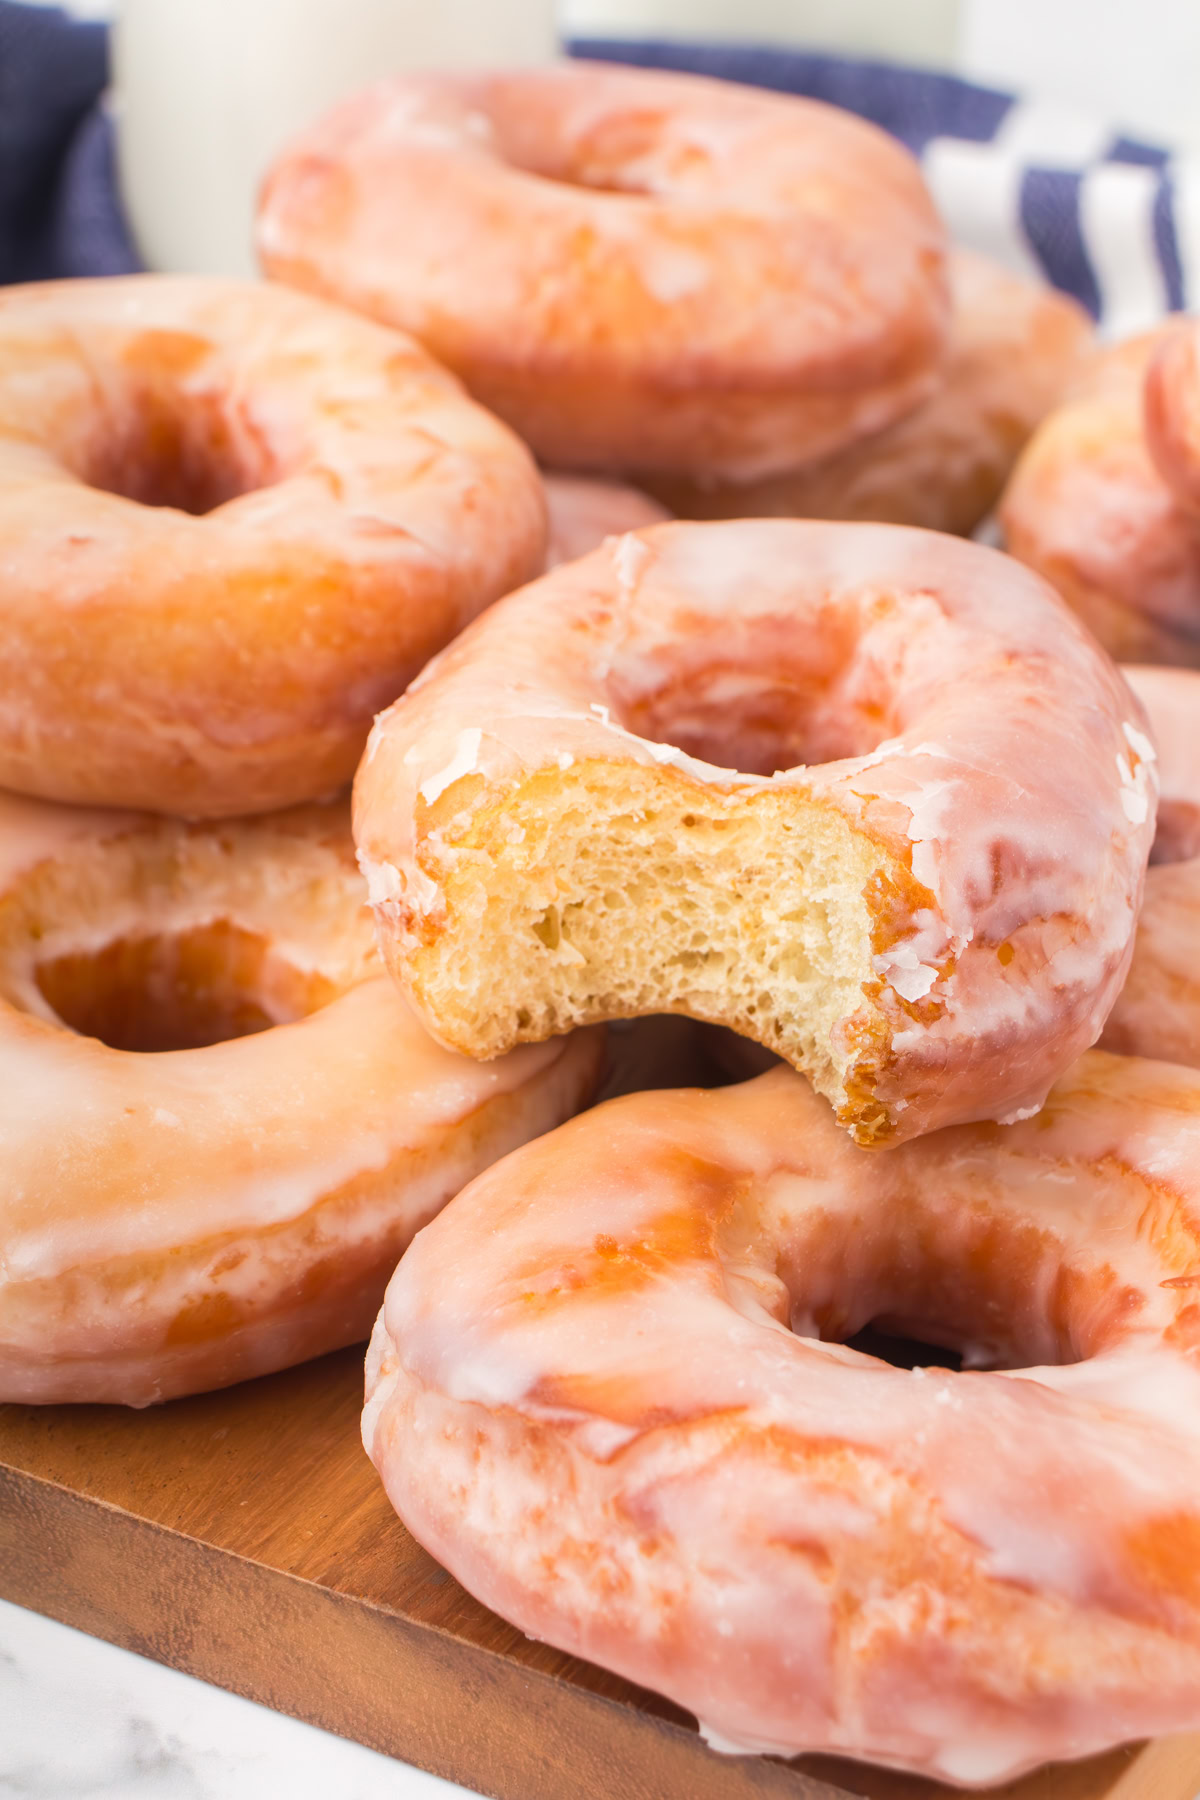
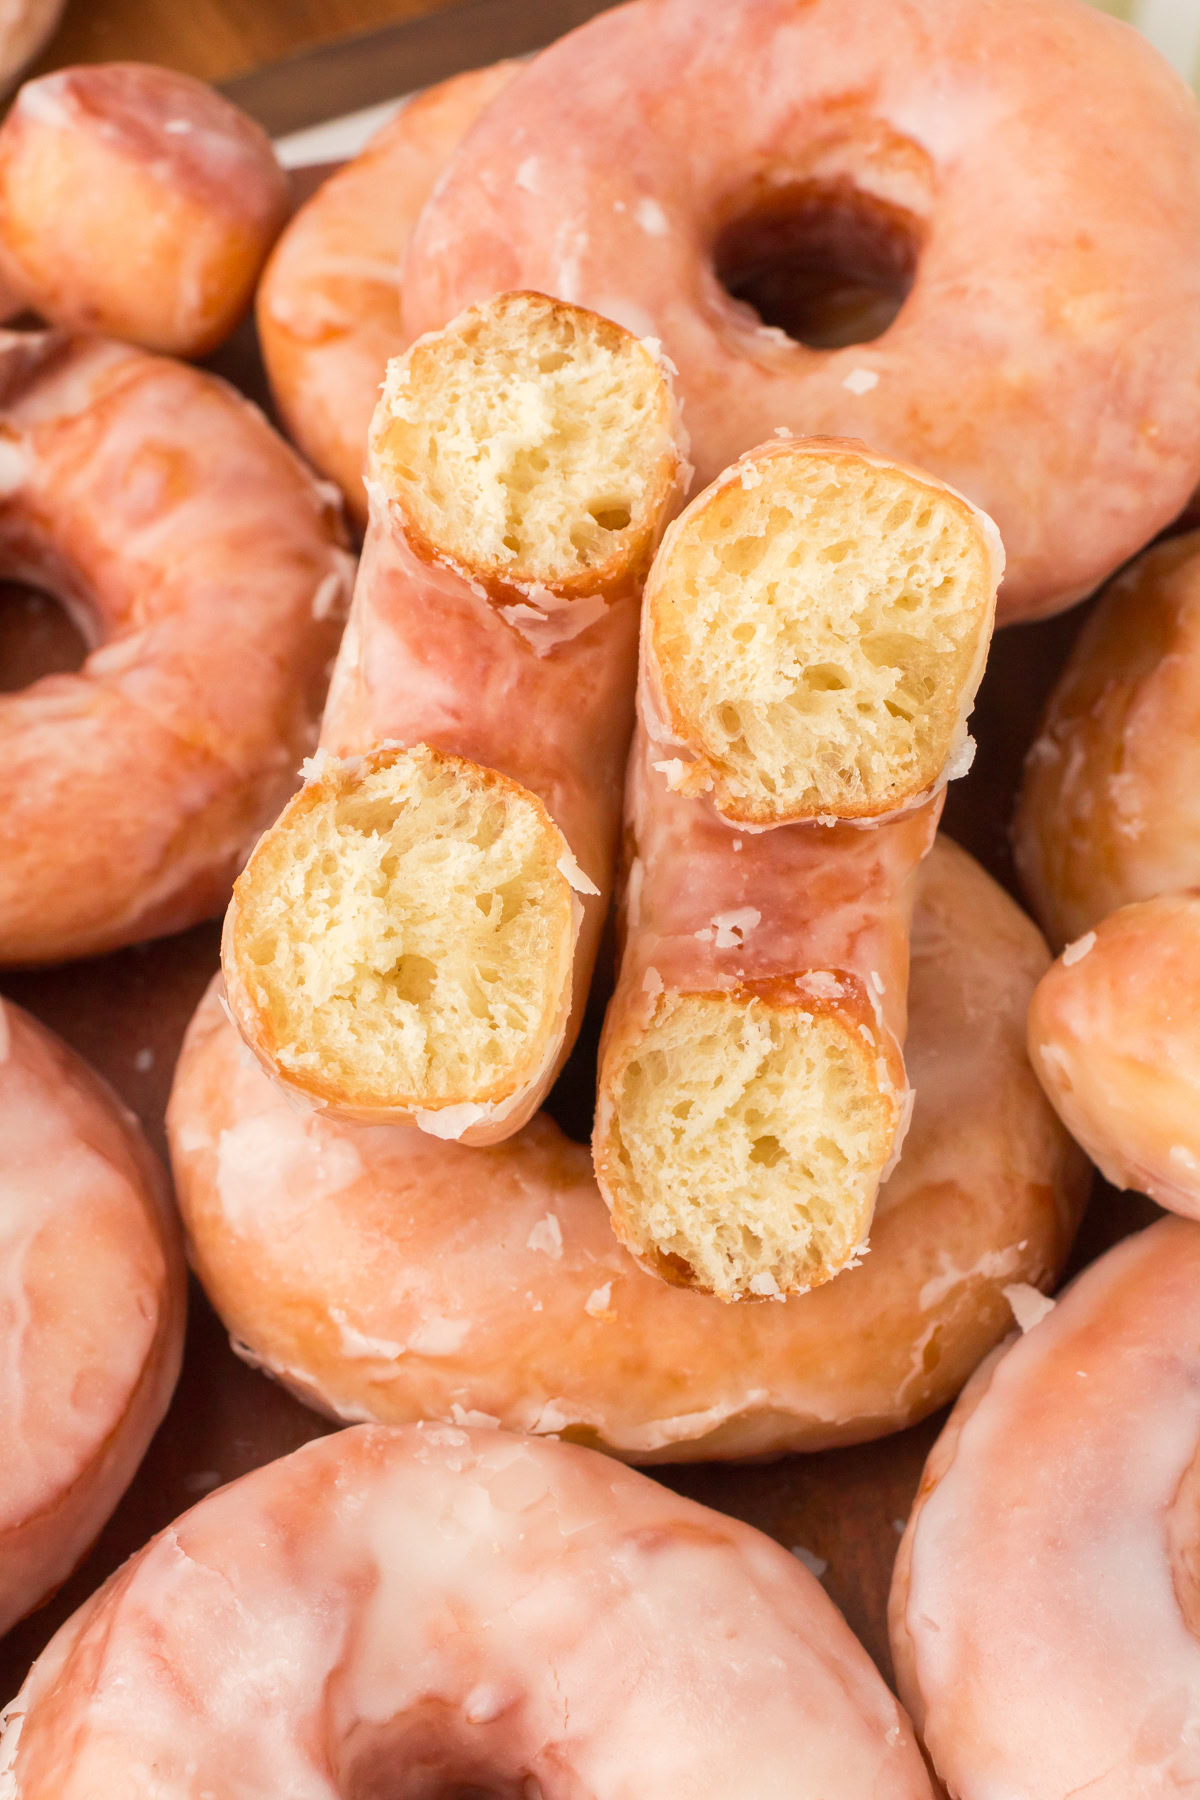
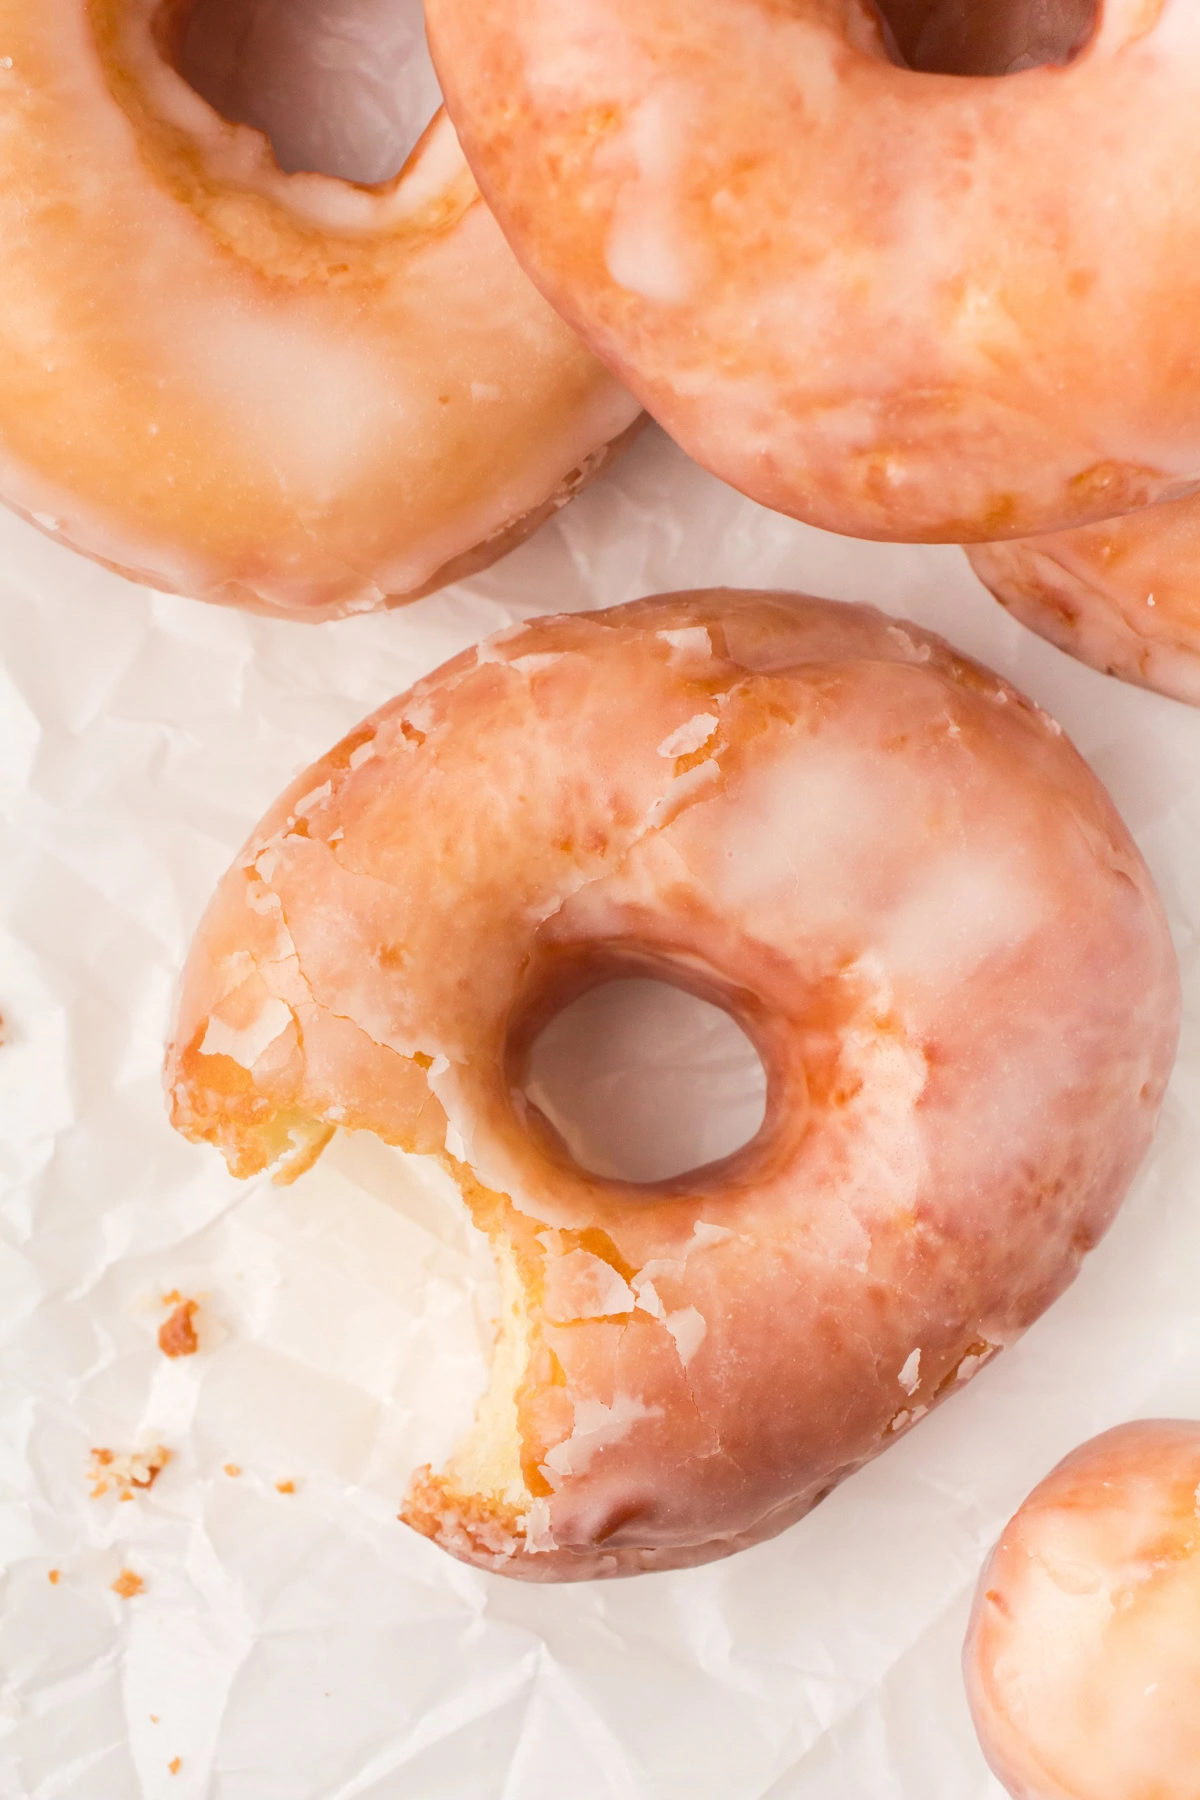
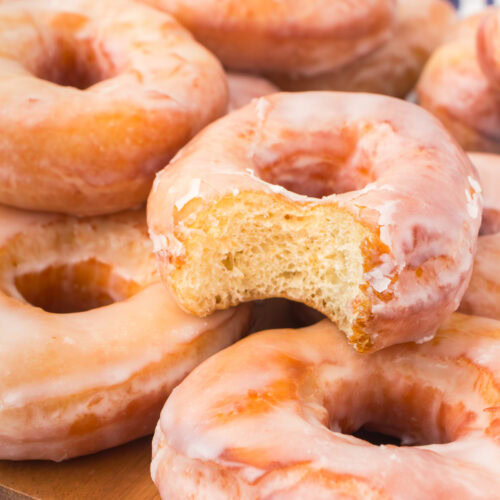
You’ll love how easy it is to make soft and fluffy bakery-style homemade glazed donuts from scratch using simple, everyday ingredients. These donuts fry up golden and then get dipped in a vanilla powdered sugar glaze that hardens perfectly every time. Serve them for weekend breakfasts, holiday treats, family get-togethers, or even a fun weeknight dessert.
Not too long ago, I learned how to make the best everything bagels; naturally, with my bagel game perfected, I decided I wanted to give homemade donuts a try. I’ve never been able to make a Krispy Kreme style donut with that perfectly soft, melt-in-your-mouth interior. In fact, I would’ve said that it just wasn’t possible– but this glazed donut recipe proved me wrong.
It all started when my son and his wife started making donuts for the local farmer’s market last fall. After a lot of recipe testing, the donuts that they came up with were a hit at the market; in fact, many of their customers said they were the best glazed donuts they’d ever had. We worked out a modified version of that recipe with some minor improvements, and I must say that I agree with his customers.
What Makes This Recipe Special
- You can make perfectly soft, light and fluffy donuts right at home, no trip to the local donut shop required.
- This classic glazed donut recipe uses simple, everyday ingredients that you probably already have on hand in your kitchen pantry.
- This is a fool-proof, beginner-friendly recipe with a no-knead donut dough. I avoid working the gluten too much, which makes for a softer dough and a more tender donut. Of course, I’ll share a secret ingredient that I think helps with this too.
- I’ll give you a few tips for a perfect vanilla glaze that hardens up every single time.
- Homemade glazed donuts are perfect for your weekend breakfast or brunch. They make a great party snack, holiday treat, or weeknight dessert!
Ingredients & Substitutions Notes
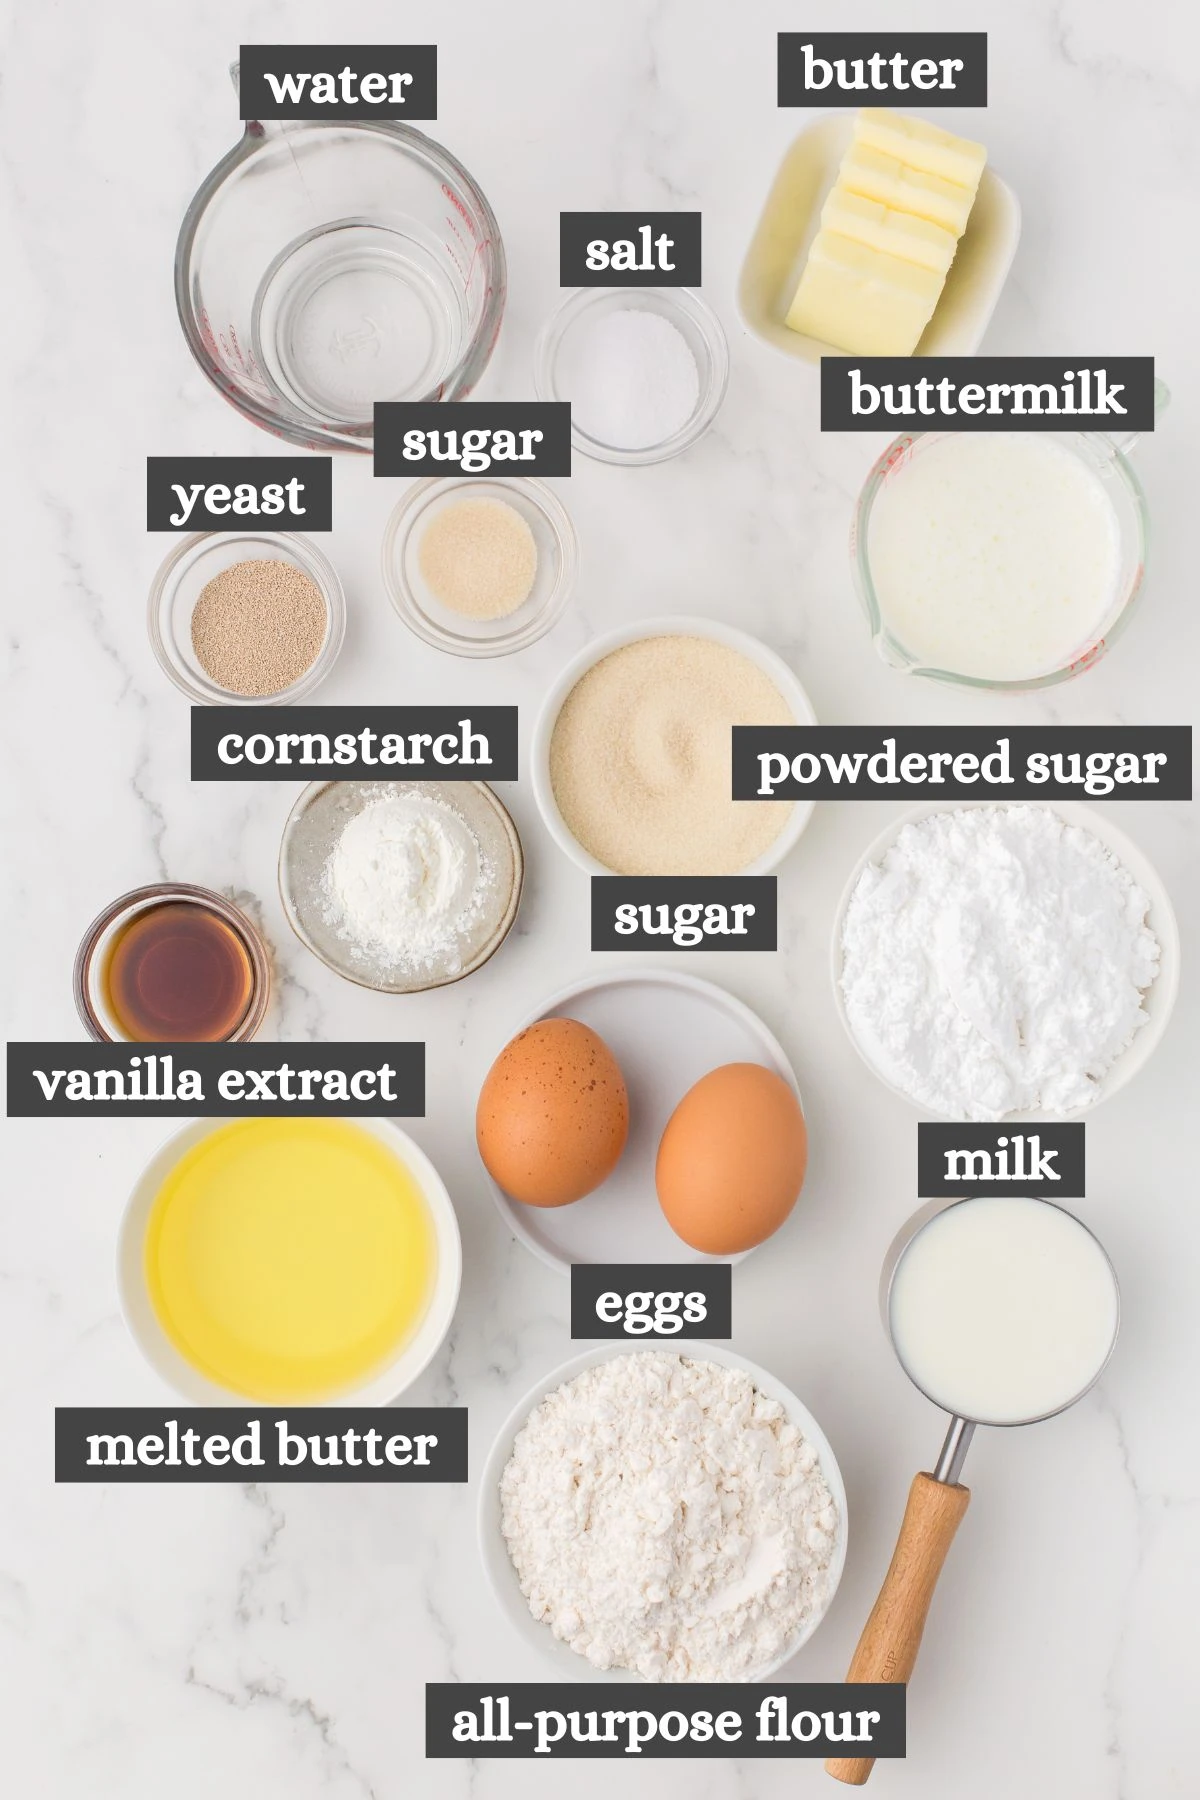
- Active Dry Yeast – I use active dry yeast because that’s usually what I have on hand. You can substitute instant yeast 1:1. That said, Instant yeast is faster to rise, so you may have to cut the rise time.
- All-Purpose Flour – Again, I’ve written this recipe up using all-purpose flour. It’s cheap, and it’s what most people have on hand. I think it makes a fine donut with a soft, fluffy texture and outstanding flavor.
- Sugar – This uses a little bit of cane sugar, but not too much. These homemade glazed donuts have the perfect level of sweetness without being overly sweet.
- Salted Butter – This is an enriched donut dough. You’ll need salted butter for richness, eggs for structure, and some buttermilk, which I’ll talk more about below.
- Buttermilk – Here’s the secret ingredient– buttermilk. The acidity from the buttermilk is at least partially responsible for the ultra-tender and soft, melt-in-your-mouth texture that these donuts definitely have. If you don’t have any buttermilk on hand, add 1 tablespoon of vinegar to whole milk, and set aside for a few minutes until it starts to curdle. This is an effective homemade buttermilk substitute.
- Frying Oil – For fried donuts, you’ll want a frying oil with a high smoke point. I use vegetable oil, but you can also use canola oil or peanut oil.
- Vanilla Extract – You’ll need a splash of vanilla extract for the vanilla powdered sugar glaze.
- Cornstarch – Optionally, I like to add a little bit of cornstarch to my glaze. It helps the glaze to stick to the donut a little bit better until it can harden up.
How to Make Homemade Glazed Donuts Recipe
If you’ve never made them before, the thought of making donuts may be intimidating. But don’t worry, because this recipe is really easy to make. Just take your time, and follow the instructions.
Mixing Up Yeast Glazed Donuts
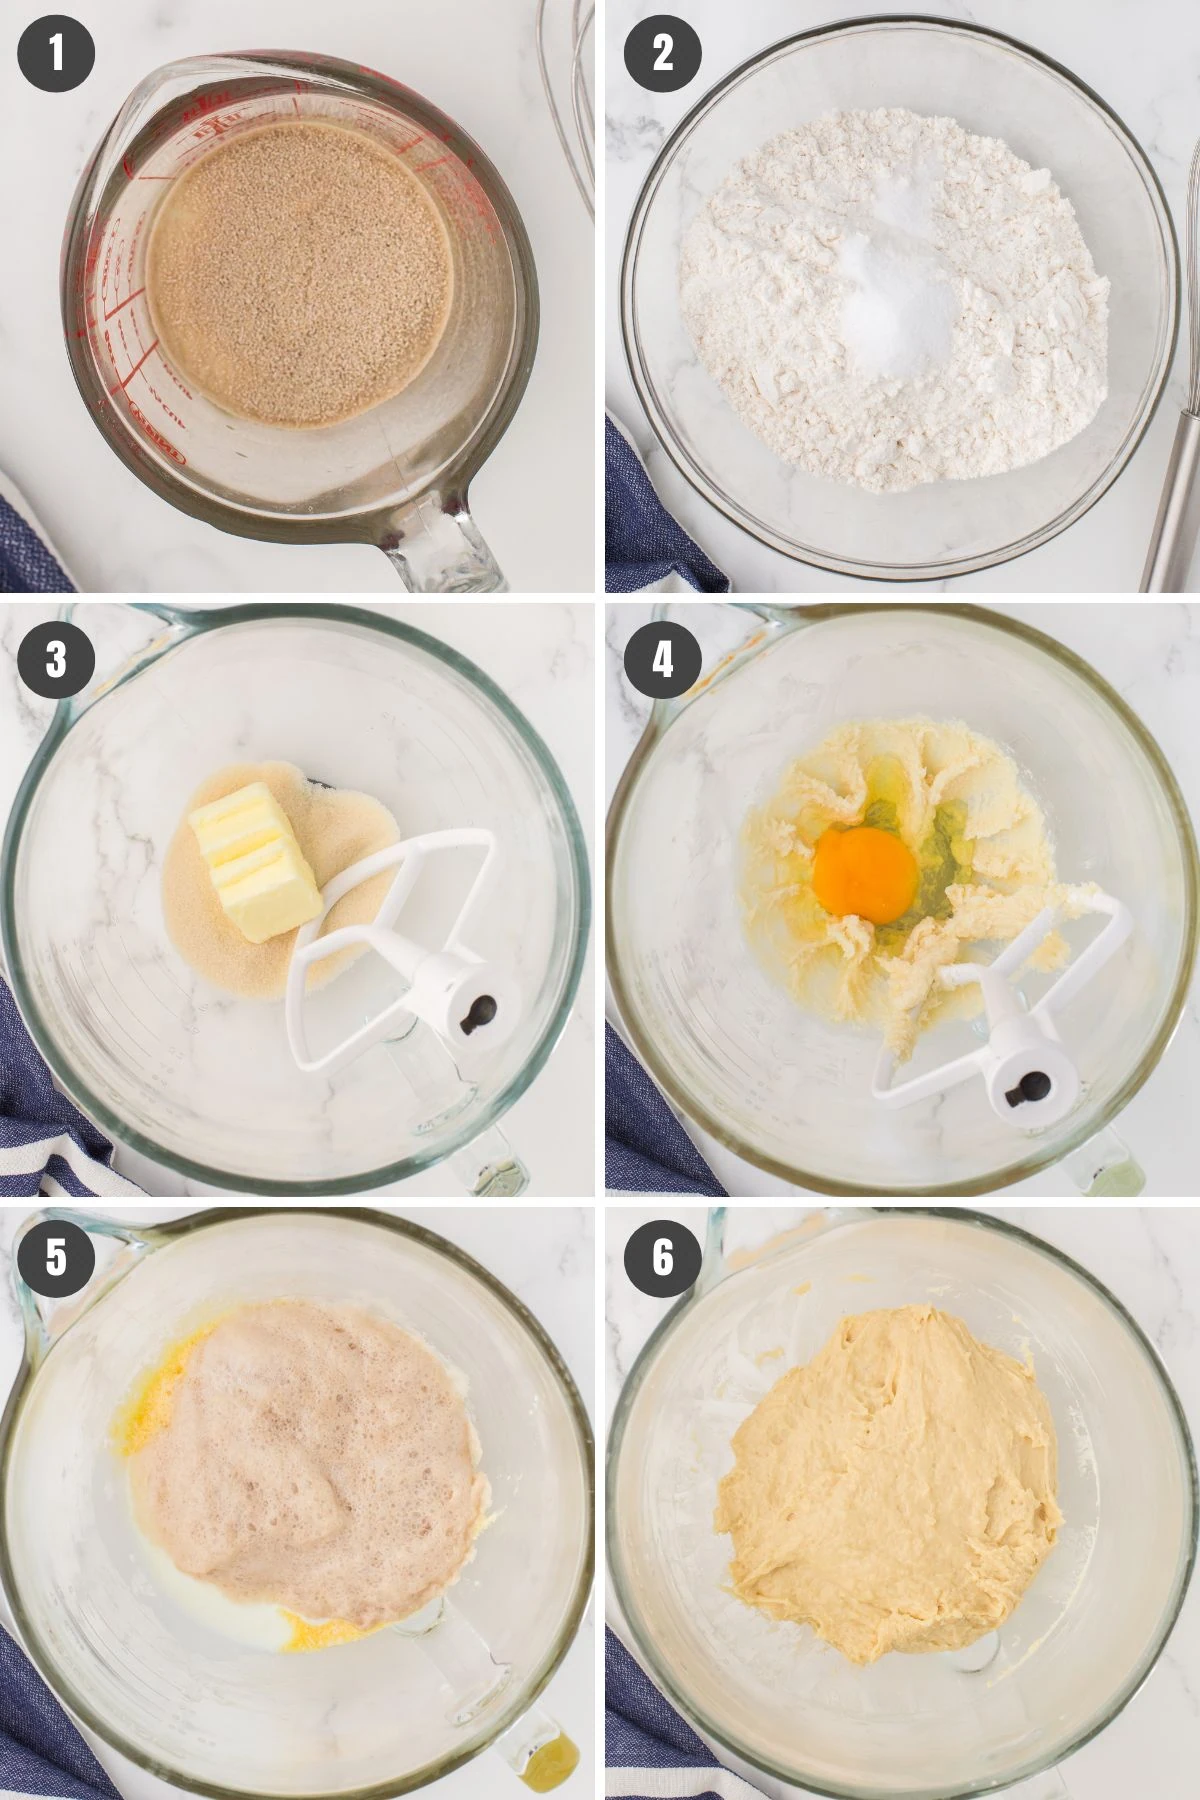
- Start by adding the 1/4 cup of lukewarm water, active dry yeast and 1 teaspoon of sugar to a small glass measuring cup, whisking together ’til well dissolved. Set aside in a warm place so that the yeast can “proof;” After a few minutes, it should become foamy and roughly double in volume.
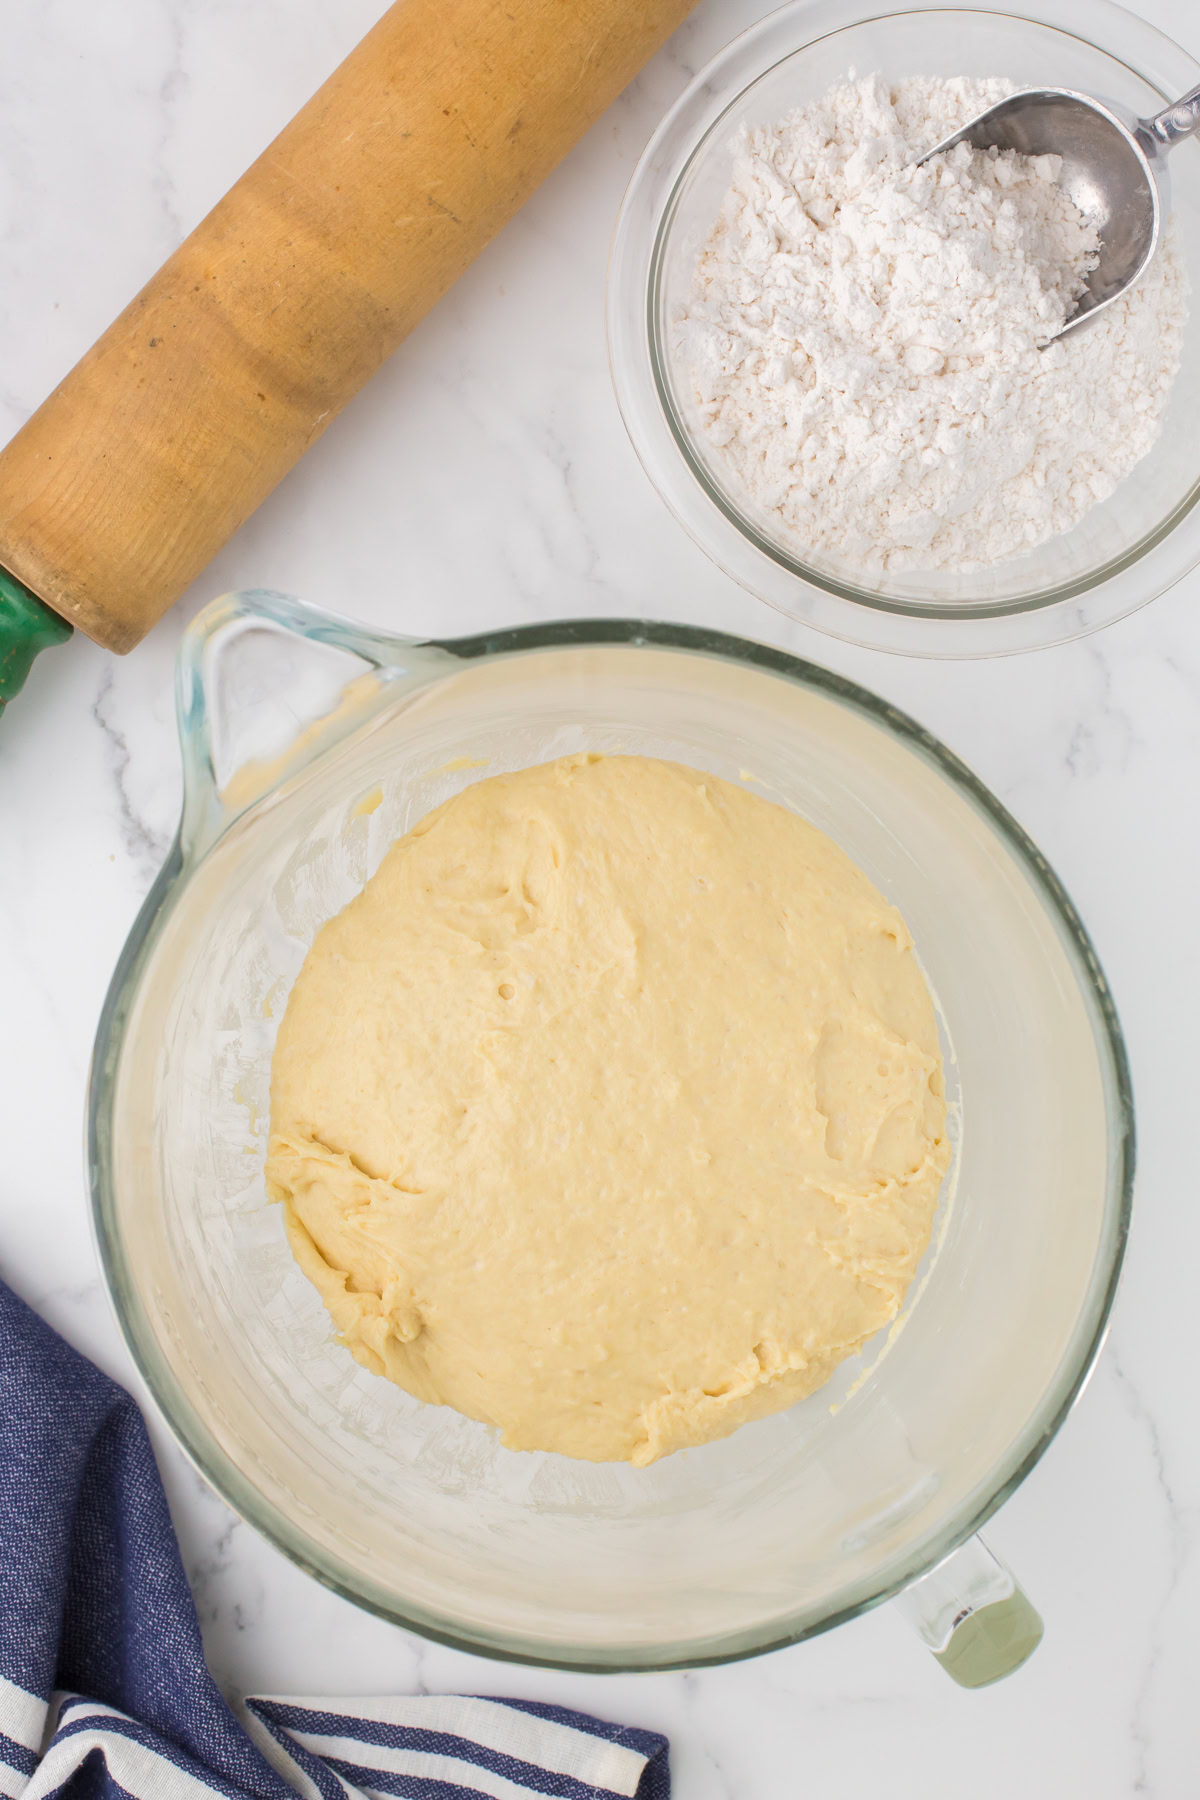
- In a medium mixing bowl, whisk together the all-purpose flour and salt. Set aside.
- In a another large mixing bowl or in the bowl of an electric stand mixer, cream the rest of the sugar with the softened butter, ’til well combined.
- Beat in each egg, one at a time, ’til incorporated; be sure to stop and scrape up the bottom of the bowl a couple of times, beating in any of the butter/sugar bits that were left behind.
- Once your yeast has proofed, go ahead and add it to the egg mixture, and then add the warm buttermilk. Whisk everything together.
- Finally, add the dry mixture to the wet mixture, and use a large wooden spoon or a dough scraper to mix everything together for a few minutes, ’til everything is well combined and you have a soft, somewhat sticky dough. If you’re using an electric mixer, you’ll want to use the dough hook for this step.
Cover your mixing bowl with plastic wrap. Let rise in a warm place for about 1 to 1 1/2 hours, or ’til roughly doubled in volume. Another surefire way to tell that the dough is fully proofed is by using the indent test.
I recommend keeping close tabs on the dough as it rises, because rise times can vary depending on the room temperature. If your house is too cold, one trick that I’ve often used is to place my mixing bowl down into a larger bowl about 1/3 full of hot tap water, covering both with plastic wrap. The warm water in the larger bowl will help to keep the dough just a little bit warmer.
How to Shape Perfectly Round Glazed Donuts
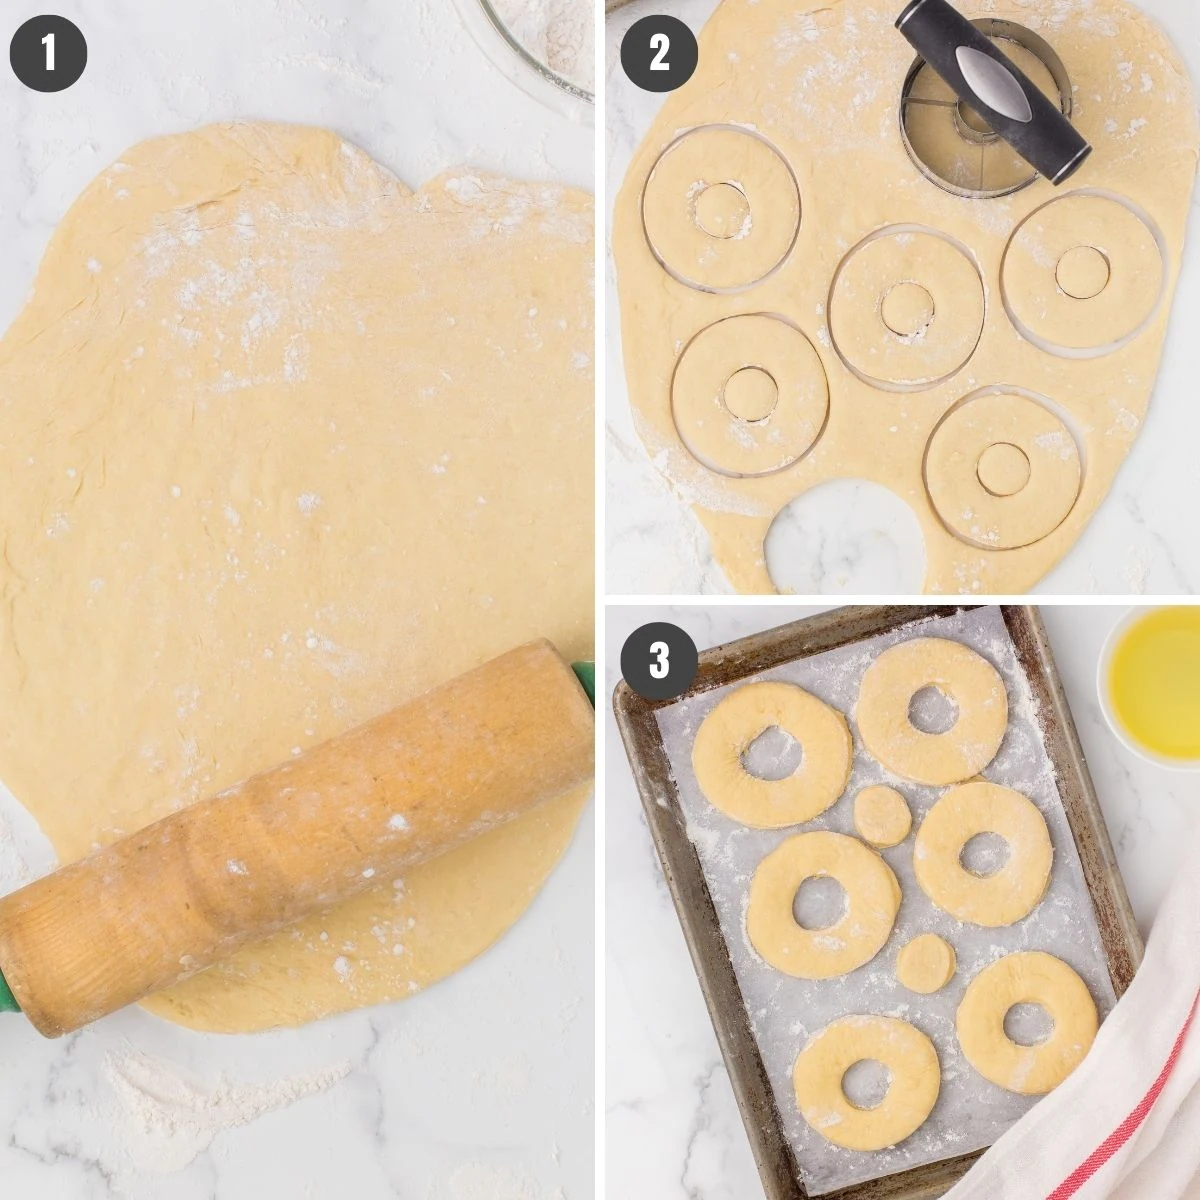
- Once your donut dough has roughly doubled in volume, use a dough scraper or a wooden spoon to turn it out onto a floured work surface. Sprinkle a little flour on top, and roll it out with a rolling pin to about 1/2″ thickness, adding more flour as necessary.
- Use a donut cutter to cut out your donuts. If you don’t want to keep the donut holes, you can re-roll them back out with the scraps, and then cut out more full-size donuts.
- Place each donut onto a well floured piece of parchment paper. Cover with a lightweight towel, and let rise for another 1 to 1 1/2 hours, or ’til roughly doubled in size.
Frying Homemade Glazed Donuts
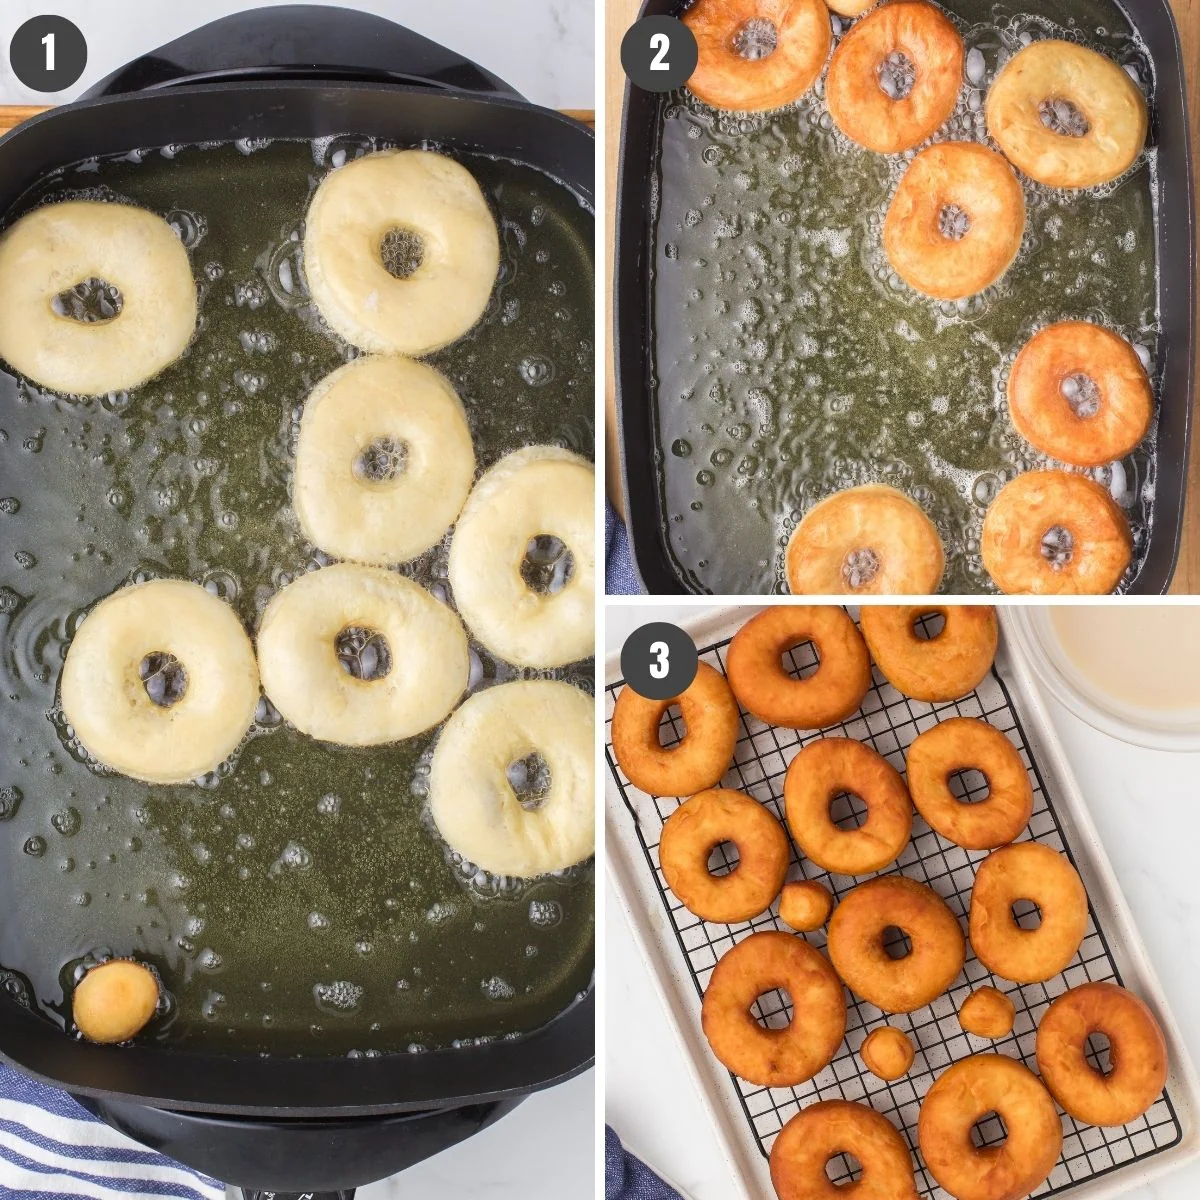
Once your donuts are close to doubled in size, it’s time to heat up the frying oil. I like to use an electric skillet with about 1-1.5″ of oil in the bottom, or a large skillet on the stovetop, heating over medium-high heat ’til the oil temperature reaches about 350-375ºF. This usually takes about 5-10 minutes.
- Once your oil temperature is closer to 375ºF, turn the heat down closer to medium (to keep it from getting too hot), and add your donuts. I can usually fit 3 donuts at a time in a 9-inch skillet. Watch your temp and turn the heat up or down accordingly to keep it in that 350-375ºF range.
- Watch the donut; once it’s gotten to be a nice golden color on the one side, usually about 1-2 minutes, flip it over and let it cook to the same color on the opposite side.
- Once cooked to the right color, use a pair of tongs or a fork to pull the donuts out, and place them onto a wire cooling rack on a baking sheet to drip off. Continue until all the donuts are fried.
How to Make the Glaze for Homemade Glazed Donuts
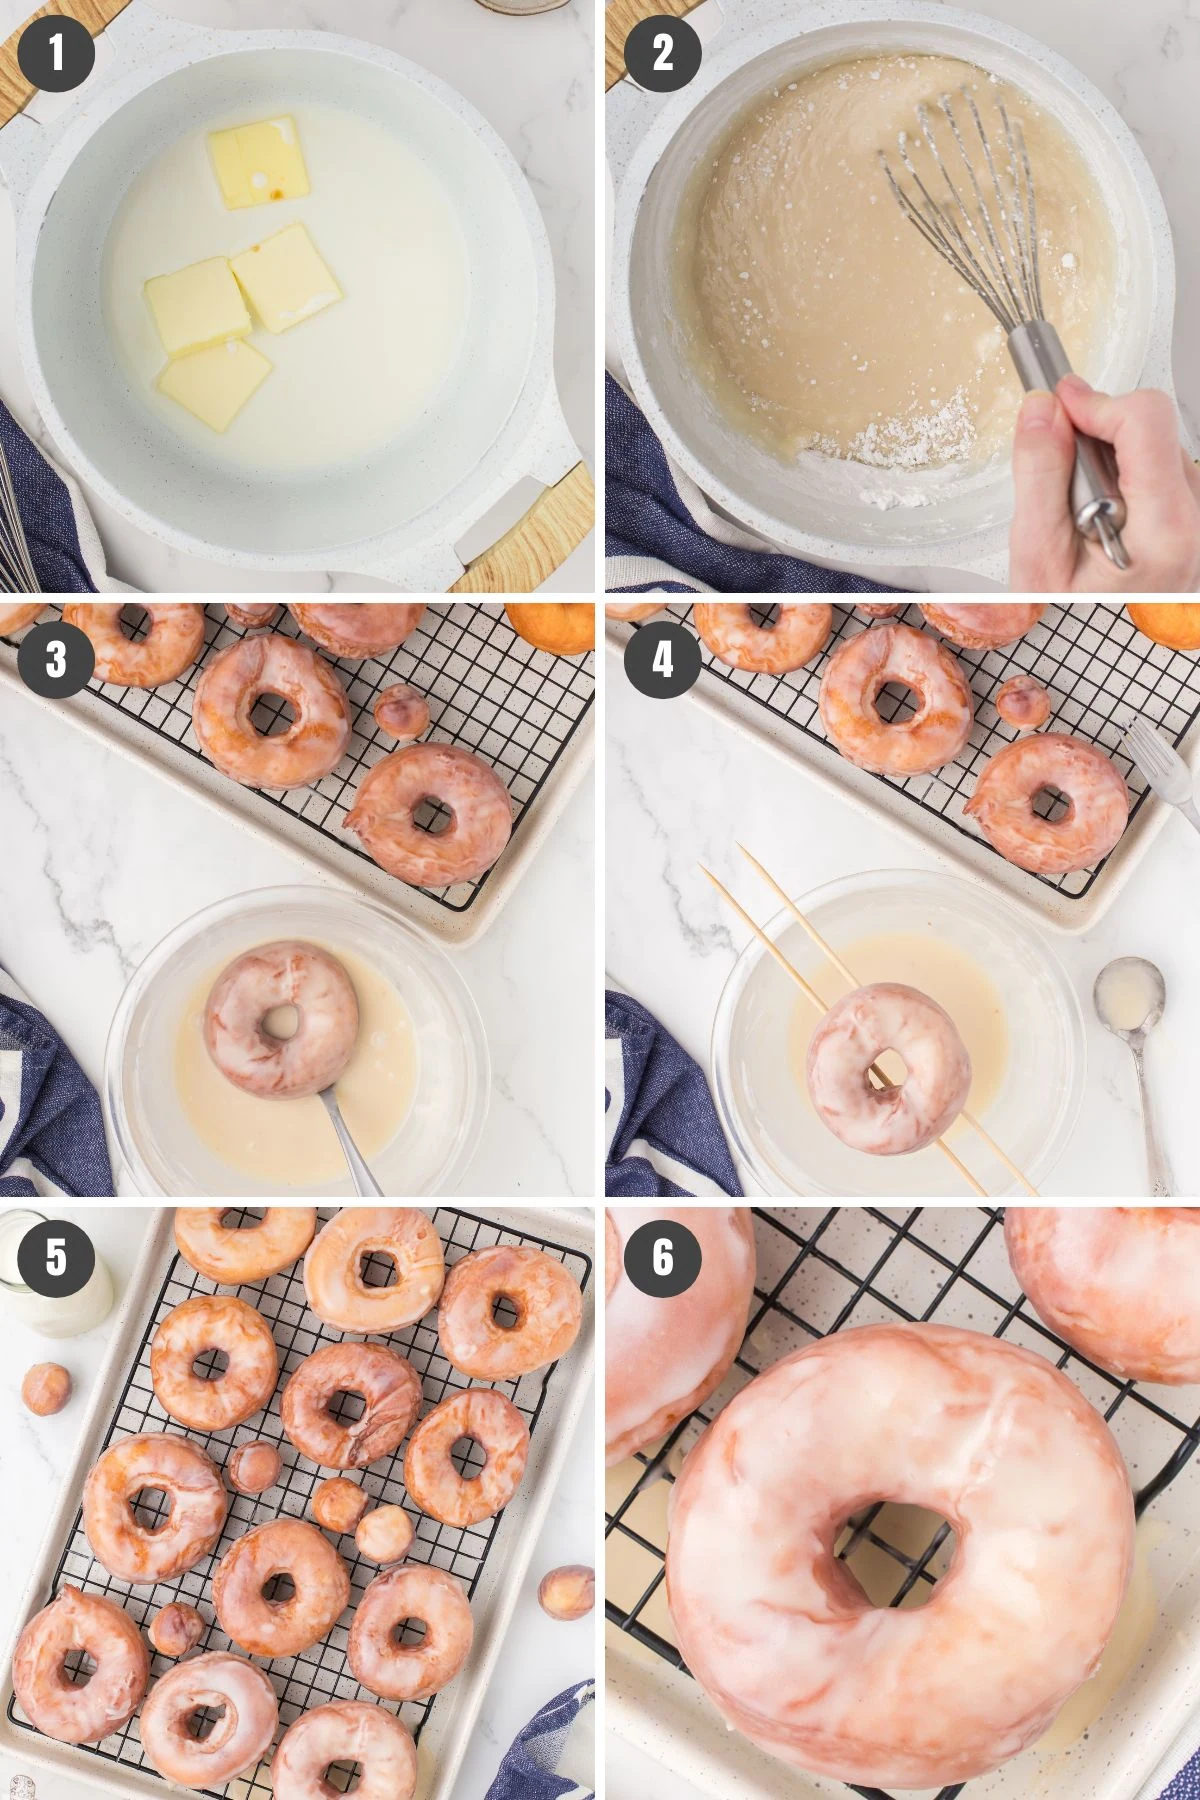
- While your donuts are rising, you can go ahead and mix up your powdered sugar glaze. Start by adding the salted butter, vanilla extract, and whole milk to a medium-size saucepan, stirring over medium-low heat ’til the butter has fully melted into the milk.
- Once the butter has fully melted into the milk, whisk in both the powdered sugar and the cornstarch ’til the sugar is well dissolved and you have a smooth, somewhat thin donut glaze. The whisk attachment in the bowl of an electric stand mixer also works well for this.
- Once all the donuts are fried, drop each one into the powdered sugar glaze in a large mixing bowl, and flip around in the glaze ’til fully coated.
- Optionally, I then like to slide each donut over a wooden skewer laid across the top of the bowl, up to 3 donuts on the skewer at a time, and then spoon more glaze over them as they drip off into the bowl.
- Let the donuts drip off for a few seconds, and then place them onto another piece of parchment paper or baking sheet so that the glaze can harden. Repeat until all the donuts are glazed.
- That’s it! Serve and enjoy with a piping hot cup of coffee or tea.
Homemade donuts are best eaten while still warm and freshly glazed right out of the fryer, but they’ll last a couple days before going stale. If you’re eating them the next day, I recommend popping them in the microwave for 20-30 seconds to soften them back up. Make your donut dough ahead of time, and then fry on demand for friends and family at social events and family get-togethers!
Expert Tips and Recipe FAQ’s
First, it’s important to make sure that the yeast is not bad by completing the “proofing” test in step 1 of this glazed donut recipe. If your yeast fails the proofing test, it’s also possible that your water was too hot. For proper activation, active dry yeast needs water temperatures that are comfortably warm, or about 105º-115ºF. Over 120ºF, and you may have killed the yeast. Otherwise, make sure that the dough is not too cold to rise. 75ºF is about the sweet spot for yeast glazed donut dough.
A low frying oil temperature usually causes this. Any colder than 350ºF, and the donuts will not brown properly, and they’ll turn out greasy because they’ve soaked up too much oil. Any higher than 375ºF, and they’ll burn before they cook all the way in the middle. This is why I like to use an electric skillet set to 350-375ºF. Most electric skillets have a thermostat with an adjustable dial for fail-proof temperature control.
Yes, you can make donut dough ahead of time and store it in the fridge overnight. You’ll want to mix up the dough and let it rise ’til just under doubled in volume. Cover with plastic wrap, and store it in the refrigerator overnight. You can roll out the dough and cut your donuts any time the next day, and then proceed with the recipe as normal.
Old fashioned glazed donuts taste best fresh. But they will store in an airtight container at room temperature for 2-3 days before going stale. You can also freeze unglazed donuts, but they won’t be as good.
Optional Variations & Flavor Ideas
- Use this homemade donut recipe to make filled donuts! You’ll want to use a biscuit cutter instead of a donut cutter with a hole in the middle. After frying and glazing, use one of those wooden skewers to poke a hole in the side. Use a piping bag and a piping tip to inject any jam or cream of your choice into the donut.
- Add maple extract to the glaze to make this a maple glazed donut. You can add cocoa powder to make it a chocolate glaze. Add instant coffee to make an espresso glaze, or add lemon juice and lemon extract for a tart lemon glaze!
- When they’re fresh out of the fryer, dip them in melted butter. Then dip them into a bowl full of cinnamon and sugar to make cinnamon sugar donuts.
- Make pumpkin spice fried donuts! Add a pinch of pumpkin pie spice and a cup or 2 of pumpkin puree to the dough.
- When my son made this recipe for the farmer’s market, they’d often make it into donut twists. This recipe gives a great tutorial on how to shape twists. Then you can fry them just the same as regular donuts.
If you try this recipe, why not leave a star rating in the recipe card right below and/or a review in the comment section further down the page? I always appreciate your feedback. You can also follow me on Pinterest, Facebook, YouTube, and Instagram. And subscribe to my email list too!
Homemade Glazed Donuts
Equipment
- Large Skillet or Electric Skillet for frying
- Candy Thermometer for frying
- Wooden Skewers optional, for glazing
Ingredients
Homemade Donuts
- 1/4 cup water lukewarm
- 1 tablespoon active dry yeast
- 1 teaspoon cane sugar
- 3 cups all-purpose flour
- 2 teaspoons sea salt
- 1/4 cup cane sugar
- 4 tablespoons salted butter softened
- 2 large eggs
- 3/4 cup buttermilk warm
Powdered Sugar Glaze
- 4 tablespoons salted butter
- 2 teaspoons vanilla extract
- 1/2 cup whole milk
- 4 cups powdered sugar
- 1 tablespoon cornstarch
For Frying
- 48 ounces vegetable oil*
Instructions
Homemade Donuts
- Start by adding the 1/4 cup of lukewarm water, active dry yeast and 1 teaspoon of sugar to a small glass measuring cup, whisking together 'til well dissolved. Set aside in a warm place so that the yeast can "proof;" After a few minutes, it should become foamy and roughly double in volume.
- In a medium mixing bowl, whisk together the all-purpose flour and salt. Set aside.
- In a another large mixing bowl or in the bowl of an electric stand mixer, cream the rest of the sugar with the softened butter, 'til well combined.
- Beat in each egg, one at a time, 'til incorporated; be sure to stop and scrape up the bottom of the bowl a couple of times, beating in any of the butter/sugar bits that were left behind.
- Once your yeast has proofed, go ahead and add it to the egg mixture, and then add the warm buttermilk. Whisk everything together.
- Finally, add the dry mixture to the wet mixture, and use a large wooden spoon or a dough scraper to mix everything together for a few minutes, 'til everything is well combined and you have a soft, somewhat sticky dough. If you're using an electric mixer, you'll want to use the dough hook for this step.
- Cover your mixing bowl with plastic wrap, and let the dough rise in a warm place for about 1 to 1 1/2 hours**, or 'til roughly doubled in volume.
- Once your donut dough has roughly doubled in volume, use a dough scraper or a scraper spatula to turn it out onto a floured work surface. Sprinkle a little flour on top, and roll it out with a rolling pin to about 1/2" thickness, adding more flour as necessary.
- Use a donut cutter to cut out your donuts. If you don't want to keep the donut holes, you can re-roll them back out with the scraps, and then cut out more full-size donuts.
- Place each donut onto a well floured piece of parchment paper. Cover with a lightweight towel, and let rise for another 1 to 1 1/2 hours, or 'til roughly doubled in size.
Powdered Sugar Glaze
- While your donuts are rising, you can go ahead and mix up your powdered sugar glaze. Start by adding the salted butter, vanilla extract, and whole milk to a medium-size saucepan, stirring over medium-low heat 'til the butter has fully melted into the milk.
- Once the butter has fully melted into the milk, whisk in both the powdered sugar and the cornstarch 'til the sugar is well dissolved and you have a smooth, somewhat thin donut glaze. The whisk attachment on an electric stand mixer also works well for this.
Frying Homemade Donuts
- Once your donuts are close to doubled in size, it's time to heat up the frying oil. I like to use a 9-inch skillet or an electric skillet with about 1-1.5" of oil in the bottom, heating over medium-high heat 'til the oil temperature reaches about 350-375ºF. This usually takes about 5-10 minutes.***
- Once your oil temperature is closer to 375ºF, turn the heat down closer to medium (to keep it from getting too hot), and add your donuts. I can usually fit 3 donuts at a time in a 9-inch skillet. Watch your temp and turn the heat up or down accordingly to keep it in that 350-375ºF range.
- Watch the donut; once it's gotten to be a nice golden color on the one side, usually about 1-2 minutes, flip it over and let it cook to the same color on the opposite side.
- Once cooked to the right color, use a pair of tongs or a fork to pull the donuts out, and place them onto a wire rack on a baking sheet to drip off. Continue until all the donuts are fried.
How to Glaze Donuts
- Once all the donuts are fried, drop each one into the powdered sugar glaze in a large mixing bowl, and flip around in the glaze 'til fully coated. Optionally, I then like to slide each donut over a wooden skewer laid across the top of the bowl, up to 3 donuts on the skewer at a time, and then spoon more glaze over them as they drip off into the bowl.
- Let the donuts drip off for a few seconds, and then place them onto another piece of parchment paper or baking sheet so that the glaze can harden. Repeat until all the donuts are glazed.
- Enjoy! Homemade donuts are best eaten while still warm and freshly glazed right out of the fryer, but they'll last a couple days before going stale. If you're eating them the next day, I recommend popping them in the microwave for 20-30 seconds to soften them back up.
If I can make these…anyone can! The dough is so nice to work with-try really are food and fluffy. The glaze is spot on.